Payments
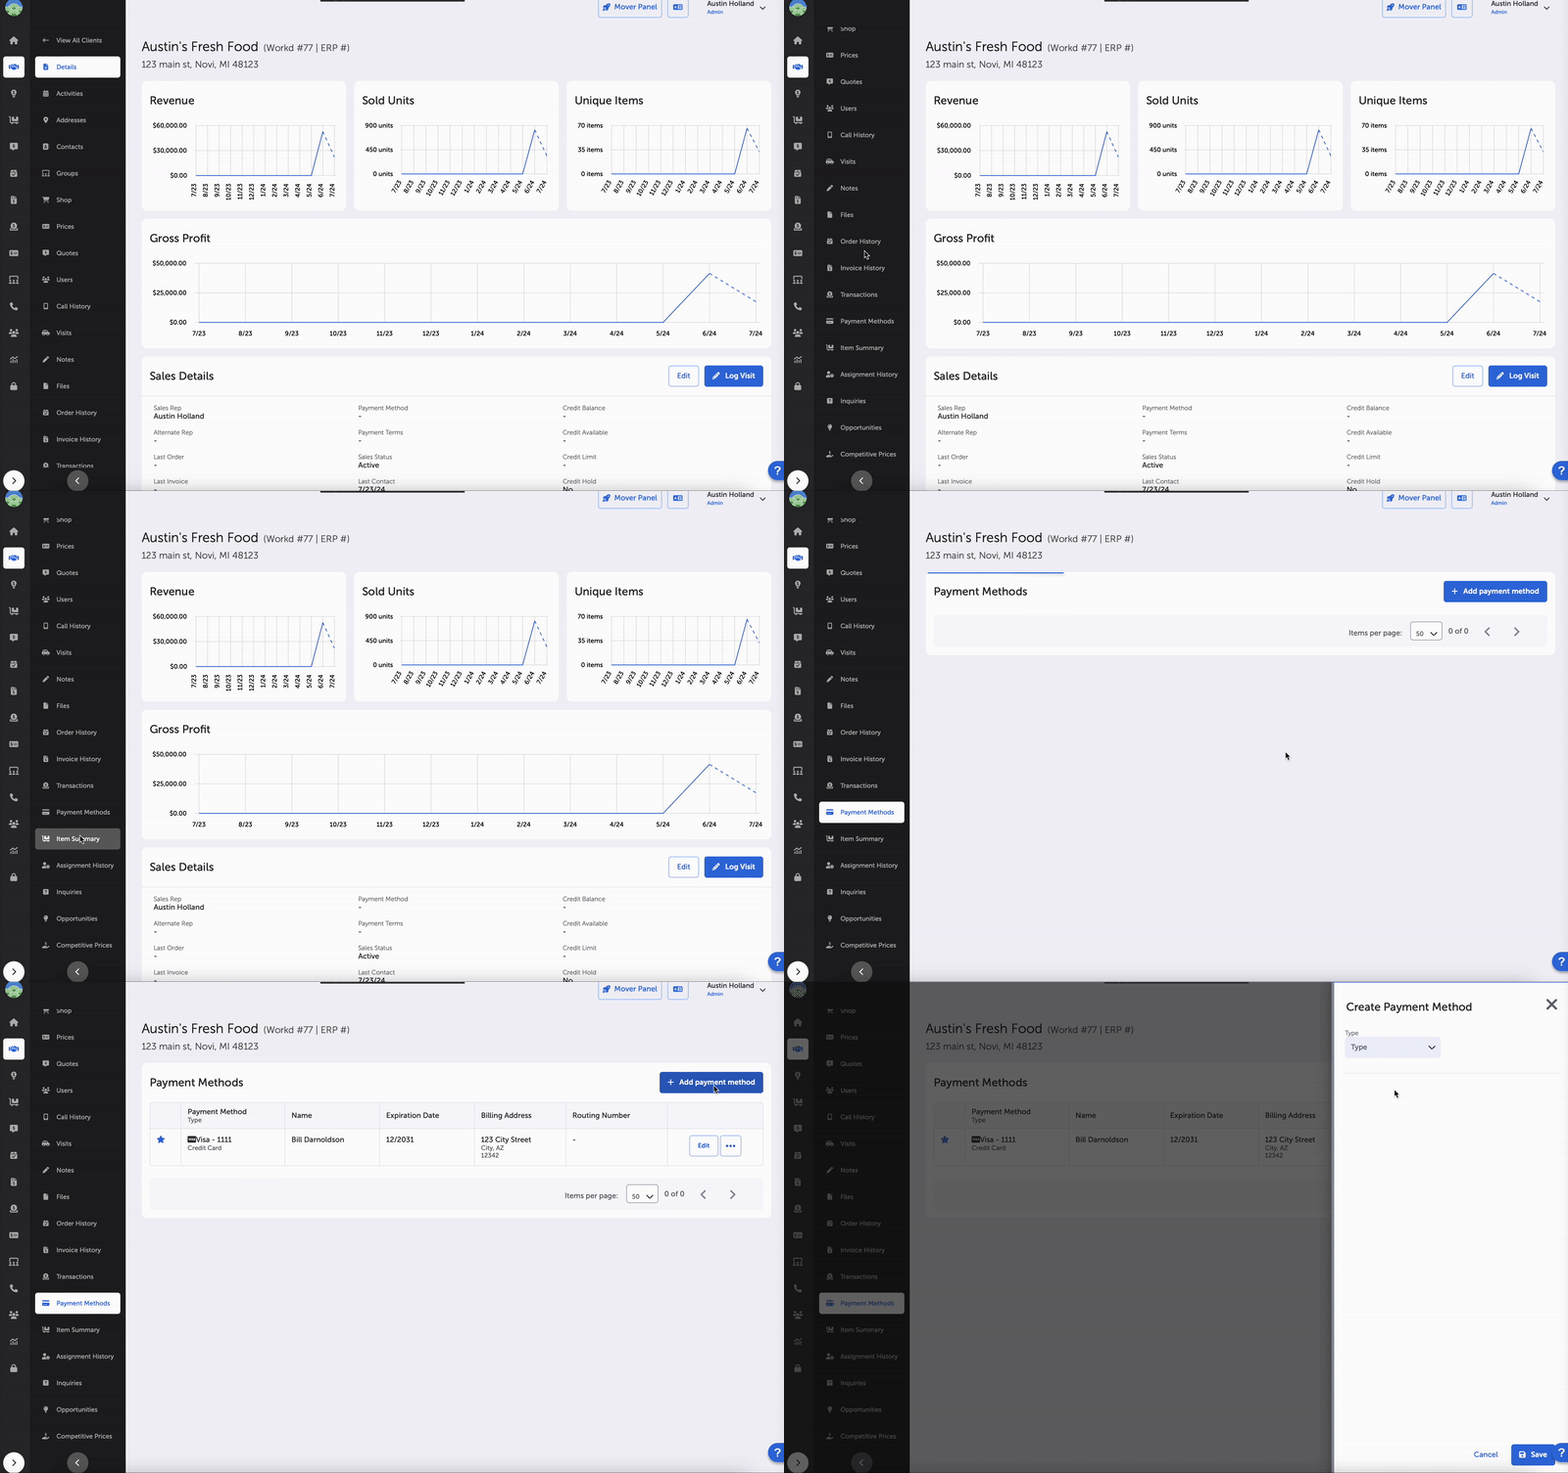
SupplyMover now has a way for CRM users to add payment methods for their customers. The Payment Method page can be found by navigating to Clients -> select client -> Payment Methods. Existing payment methods will be listed with the following information:
- Payment Method (card or account, including last four digits)
- Type:
- Credit Card
- ACH
- Cash
- Check
- Type:
- Name
- Expiration Date
- Billing Address (#, street name, city, state, zip)
- Routing Number (ACH)
Users can edit customer payment methods by selecting the “Edit” or the down arrow button with the following options:
- Edit
- Set as Primary
- Delete Payment Method
Selecting any of the options above will open a side panel where updates can be made.
Specific Payment Methods can be saved as Favorites with the star icon.
Users can add a new payment method by selecting the + Add Payment Method button. A side panel opens with the following inputs:
- Type (dropdown):
- Credit Card – when selected the following is displayed:
- Card Information:
- Credit Card Number (required)
- Expiration Date (MM / YYYY) (required)
- Name on Card (required)
- Security Code (required)
- Billing Address:
- Address Line 1 (required)
- Address Line 2 (required)
- Zip / Postal Code (required)
- City (required)
- State (required)
- Set as primary payment method (checkbox)
- Card Information:
- eCheck or ACH Account – when selected the following is displayed:
- Account Information:
- Account Type (required; dropdown):
- Checking
- Saving
- Name on Account (required)
- Routing Number (required)
- Account Number (required)
- Account Type (required; dropdown):
- Billing Address:
- Address Line 1 (required)
- Address Line 2 (required)
- Zip / Postal Code (required)
- City (required)
- State (required)
- Set as primary payment method (checkbox)
- Account Information:
- Credit Card – when selected the following is displayed:
Full credit card numbers and account numbers are not stored in SupplyMover.

All transactions – CRM and Ecommerce generated – are viewable by navigating to Clients -> select client -> Transactions. Existing transactions are displayed with the following information:
- Workd ID (hyperlink to transaction details)
- Origin:
- CRM
- Ecommerce
- External
- Origin:
- Payment Method:
- Card number/account number– last 4 digits
- Type (ACH, credit card, cash, check)
- Name
- Amount
- Net Amount
- Date (date, time)
- Status (types: e.g., Failed, Success)
Users can search, sort, and filter existing Transactions by the following:
- Search (keyword)
- Origin (multi-select dropdown):
- Automated (by processor, e.g., autodraft)
- CRM
- External
- Ecommerce
- Status (multi-select dropdown):
- Failed
- Partially Refunded
- Processing
- Processing Refund
- Refunded
- Succeeded
- Voided
- Start Date (calendar date selection)
- Sort (dropdown):
- Modified Date (Old – New)
- Modified Date (New – Old)
- More (filters button):
- End Date (calendar date selection)
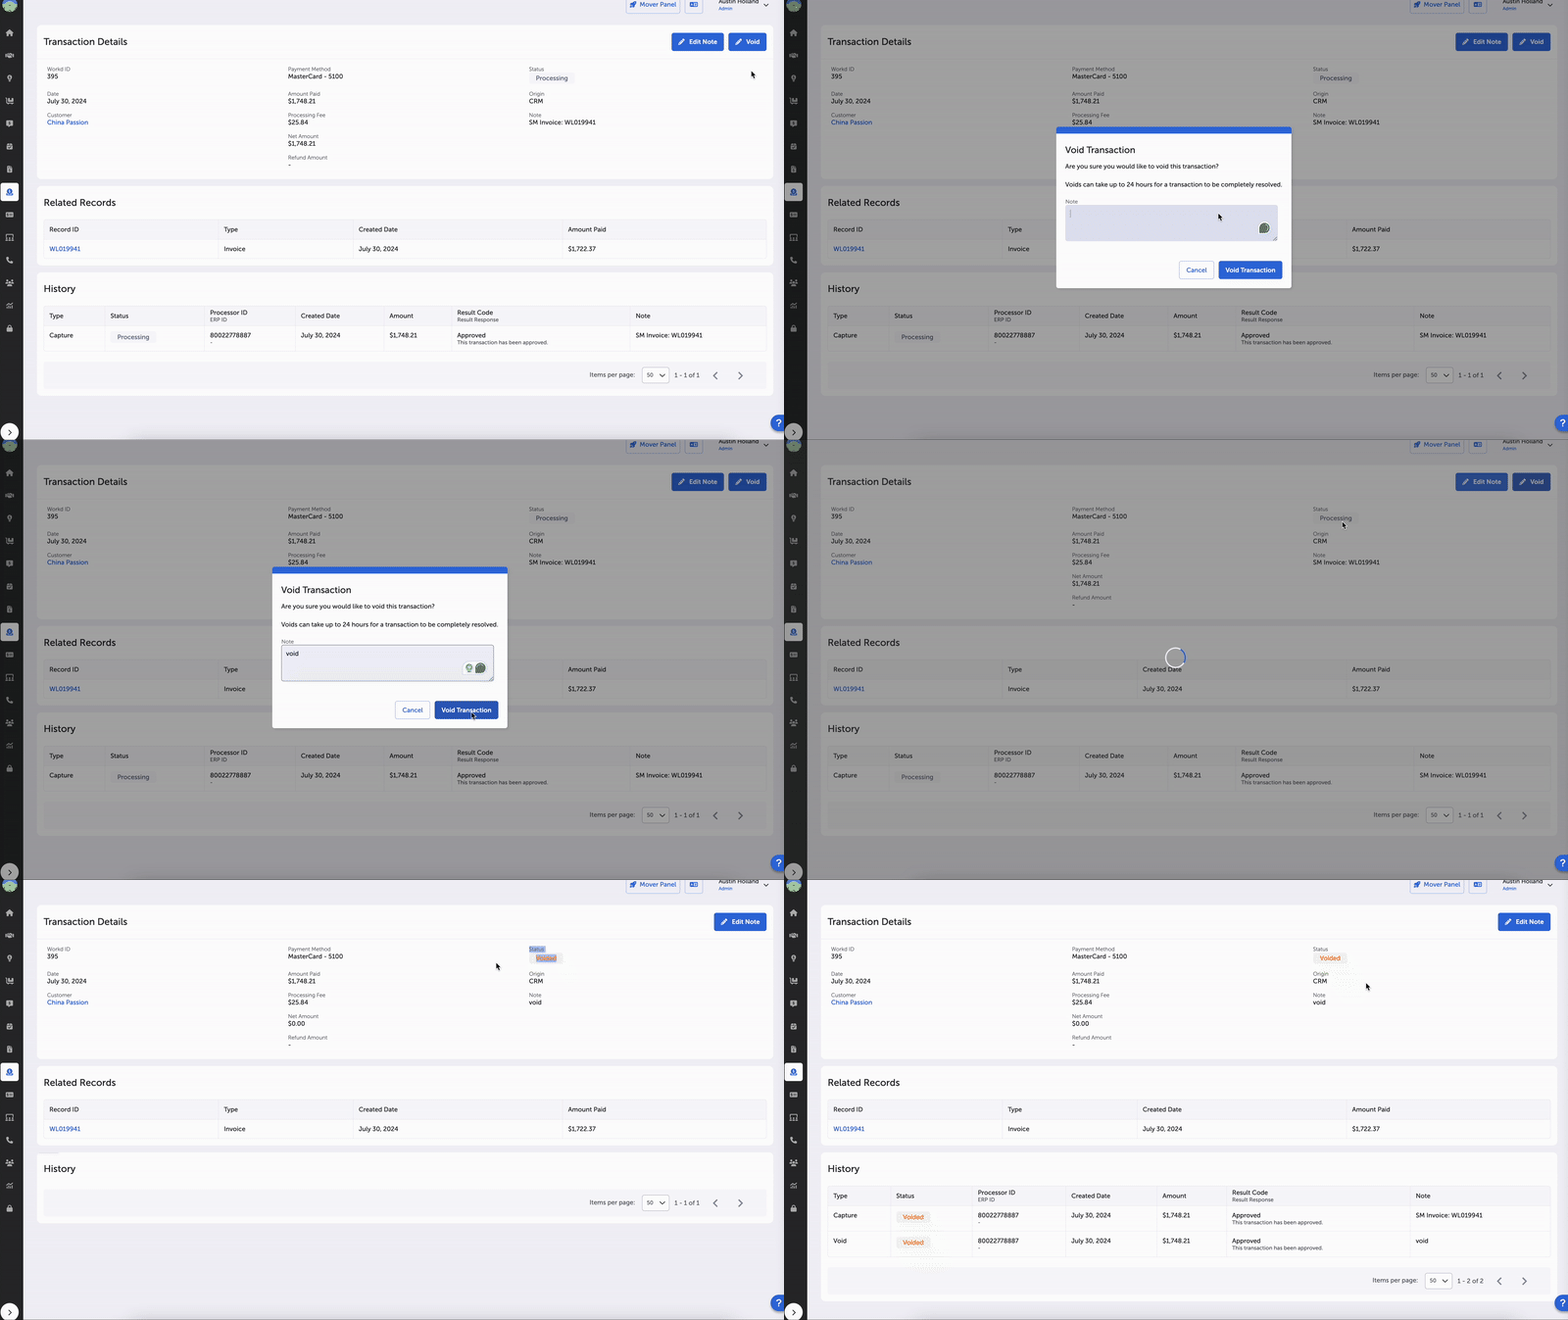
Users can see a Transaction’s Details by following the Workd ID link. The Transaction Details page includes a “Related Records” section which is similar to the “Related Purchases.” The Related Records section displays the following for each record:
- Record ID
- Type (Invoice and Sales Order)
- Created Date
- Amount Paid
Users can see the history for a specific transaction in the History section of the Transaction Details page. The History section displays the timeline/workflow of the transaction. Existing transaction processes list the following:
- Type (Capture, Authorization, or Sale)
- Status (Processing, Failed, or Succeeded)
- Processor ID, ERP ID
- Last Modified Date
- Amount
- Result Code, Result Response (data will be populated with the information given by merchant vendor used to process payments)
- Note
Users can edit Notes by selecting blue “Edit Note” button at the top of the Transaction Details page. An input window will open where users can make edits and save note updates to the transaction.
If the transaction is mid-process, users can void the transaction by selecting the “Void” button. A confirmation window will appear with the following statement, “Voids can take up to 24 hours for a transaction to be completely resolved.” Users can also add a note to the Void Transaction.
Once voided, the transaction status will be updated to “Voided.”
Sales Managers and Admins can void transactions.

The “Refund” button shows as an option for an individual transaction when the transaction’s status is “Succeeded.” Once users select the Refund button, an input window will appear with the following tasks:
- Enter a Refund Amount (required; default is original transaction amount)
- Enter a Note (optional)
- Select the blue “Refund Transaction” button to finalize
Once entered, the transaction status will change to “Processing Refund.”
Refunds are completed up to the total of the original charge, including processing fee.
Refunds can be voided as well. See the Void process above for further information.
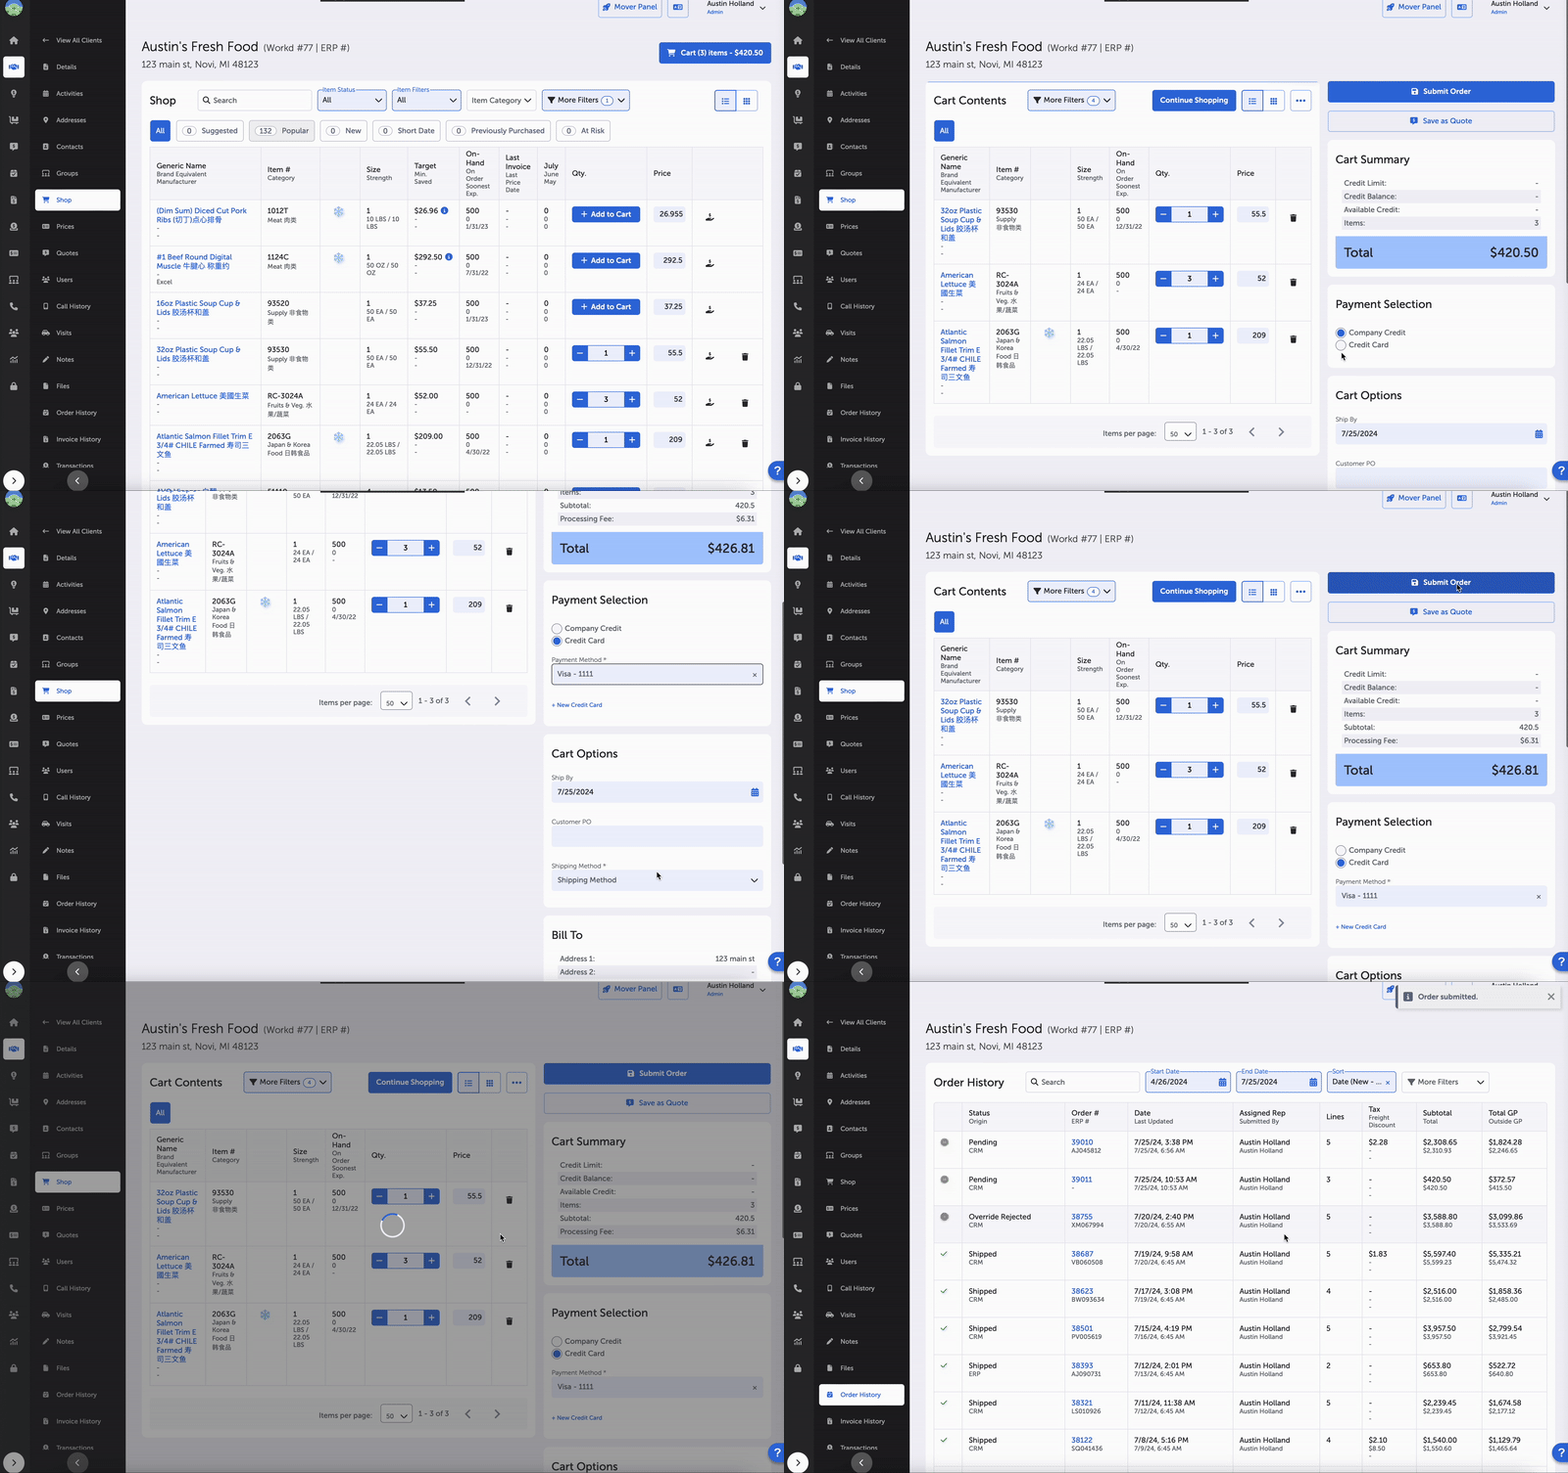
Clients who have the Payment Plugin turned on will see Payment Method options displayed on the Cart page. Once users navigate to Clients -> select client -> Shop -> Cart. The Cart Options section displays a “Payment Selection” toggle with the following:
- Company Credit
- Credit Card (if selected, a required Payment Method dropdown will appear with existing methods)
Users can add a new credit card by selecting “+ New Credit Card.” For further details, see “Add New Payment Method” section above.

When users navigate from Clients -> select client -> Order History -> select Order # (hyperlink), the Order Details page now lists a Transaction section. This section will only appear when a client has the Payments Plugin turned on. The information displayed is the same as the client’s Transactions page – see above for details.
Transactions that are in a Processing status can be voided from the Transaction Details page.
Client Admins can control role permissions for placing payments, voids, and refunds.
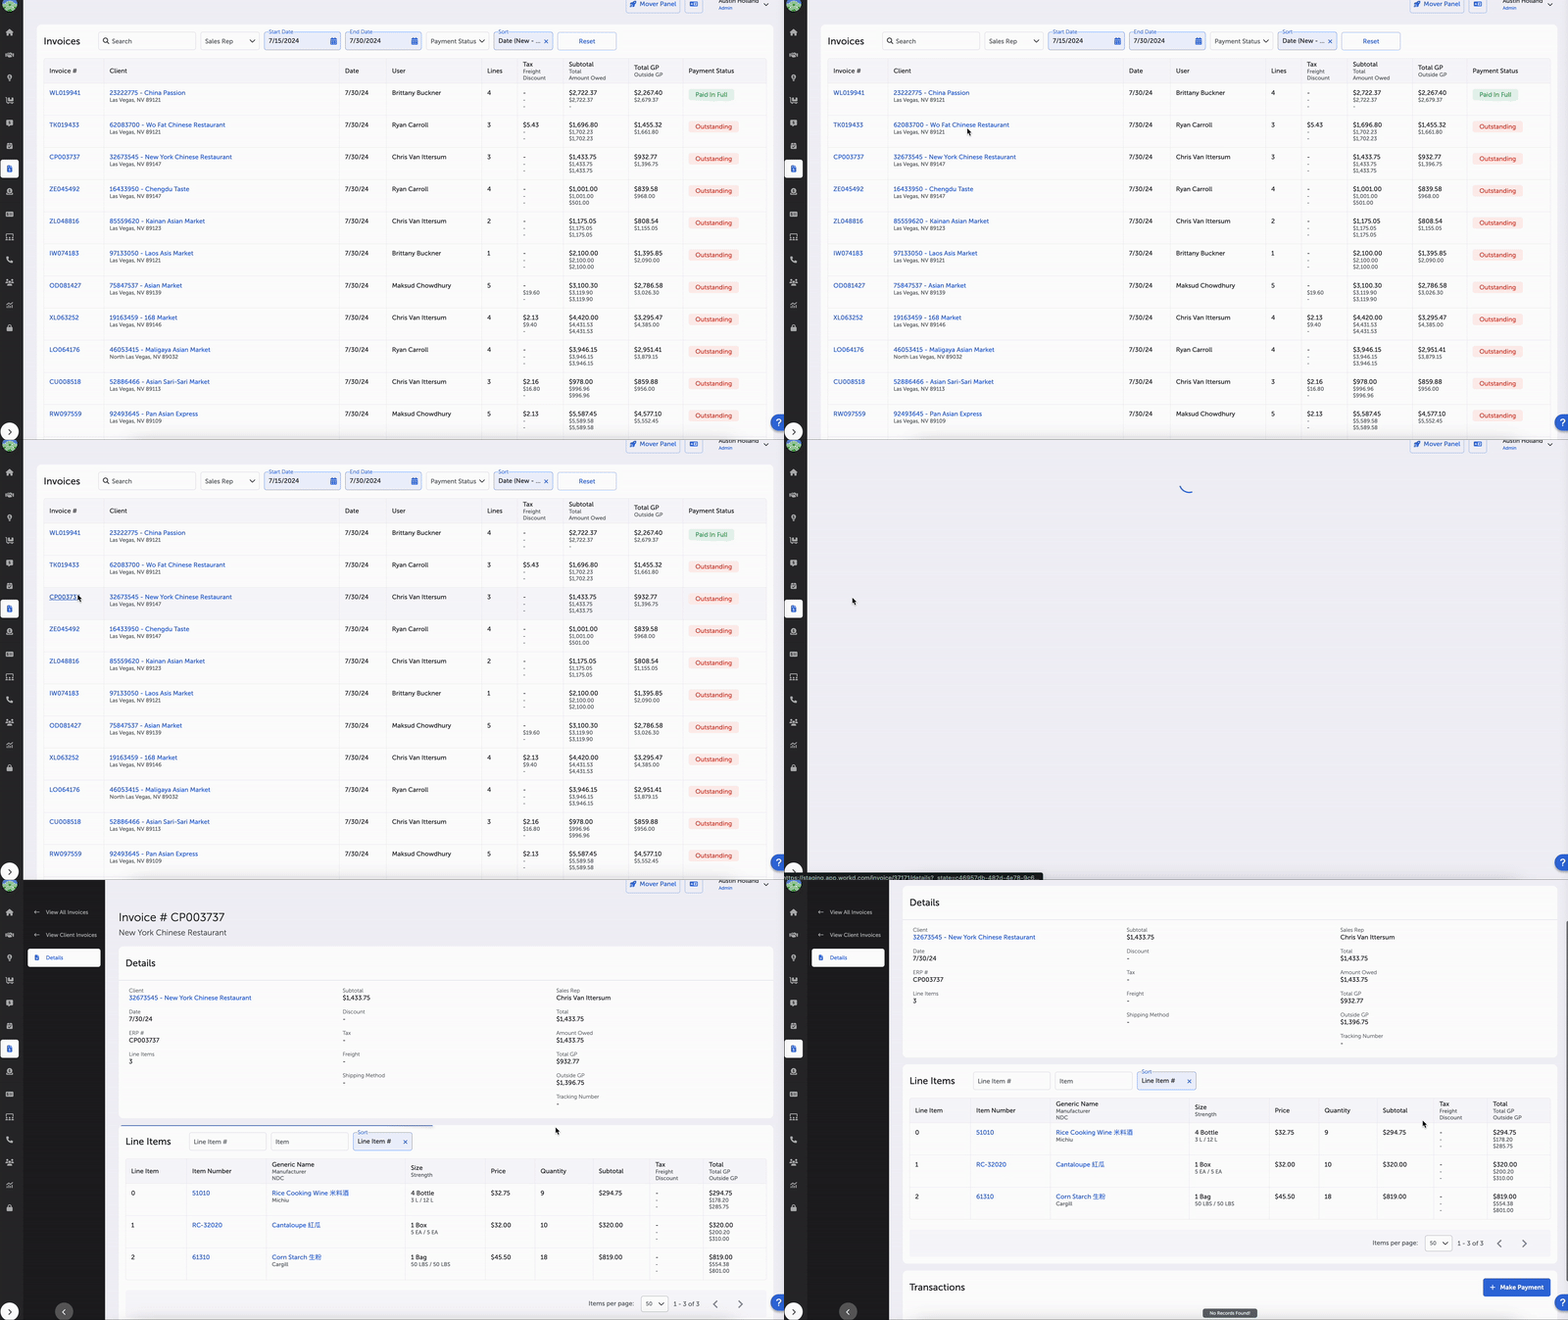
When users navigate to the Invoices main page, a Payment Status filter allows users to view invoices based on financial status including:
- Paid In Full
- Outstanding
When users select a specific invoice #, a Transaction table is included to show all the payments made toward the invoice.
Users can make payments from this section by selecting the “+ Make Payment” button. The following inputs/information is displayed:
- Payment Information:
- Payment Method:
- Select Payment (dropdown):
- Add credit card
- Add eCheck (ACH)
- Both options open side panel with input; see “Add New Payment Method” above
- Select Payment (dropdown):
- Payment Amount
- Edit Payment Method (button)
- Payment Method:
- Transaction Details:
- Invoice # (required, auto-populated, and locked)
- Transaction Note (optional)
- Summary:
- Customer Name
- Payment Method
- Amount Owed
- Total
Users can add new payment methods by selecting the “+ Create Payment Method” button.
Once all information is entered, select the blue “Submit Payment’ button to complete.

(Admins and Sales Managers)
Admins can view all transactions made for all customers by navigating to Main Navigation Menu -> Transactions.
The Global Transactions page displays the same information as the individual client’s Transaction page with the following exceptions:
- Client column has been added displaying:
- Client Name
- Street Address
- City, State, Zip Code
- Keyword searchable by Customer Name
(Payment Plugin options; Admin only)
Clients who have the Payment Plugin turned on, and who wish to charge a Processing Fee on transactions, can do so via Workd enabled configuration. Details include:
- Processing fees can be assessed for Credit Card or eCheck (ACH) payments
- Processing Fee Type can be assessed either as a Percentage or a Flat Fee
- Accepted Payment Types can be designated and include the following options:
- Credit Card
- eCheck Account (ACH)
- Cash
- Check
Main Page -- Payments
Updated 16 days ago
